DIY Guide: How To Build And Use A Homemade Gravel Drag For Your Driveway
Are you tired of uneven gravel driveways causing bumps and potholes every time you drive through? A homemade gravel drag might just be the solution you need. This simple yet effective tool can transform your driveway maintenance routine, saving you time and money. Whether you’re a DIY enthusiast or someone looking for a practical way to improve your property, learning how to create and use a gravel drag can make a world of difference. With the right materials and a bit of effort, you can achieve professional-grade results without breaking the bank.
A homemade gravel drag is essentially a tool designed to level and smooth out loose gravel surfaces. It works by redistributing gravel evenly across your driveway, eliminating uneven patches and ensuring a smooth driving experience. Not only does this improve the aesthetics of your property, but it also enhances safety by reducing the risk of vehicle damage caused by uneven surfaces. The beauty of a homemade gravel drag lies in its simplicity—most designs require minimal tools and materials, making it accessible to almost anyone. Plus, it’s an eco-friendly alternative to hiring heavy machinery or purchasing expensive equipment.
In this article, we’ll guide you through everything you need to know about building and using a homemade gravel drag. From understanding its benefits to step-by-step instructions, we’ll cover all aspects of this DIY project. Whether you’re a beginner or an experienced DIYer, this guide will equip you with the knowledge to create your own gravel drag and maintain your driveway like a pro. So, let’s dive in and explore how this ingenious tool can revolutionize your driveway maintenance routine!
Read also:What Happened With Ron From Jersey Shore A Comprehensive Look At His Journey
Table of Contents
- What is a Homemade Gravel Drag and Why Should You Consider Making One?
- How Does a Homemade Gravel Drag Work?
- What Tools and Materials Do You Need to Build a Gravel Drag?
- Step-by-Step Guide: Building Your Own Homemade Gravel Drag
- How to Use Your Homemade Gravel Drag Effectively?
- Maintenance Tips: Keeping Your Gravel Drag in Top Shape
- Is Building a Homemade Gravel Drag Worth the Effort?
- Frequently Asked Questions About Homemade Gravel Drags
What is a Homemade Gravel Drag and Why Should You Consider Making One?
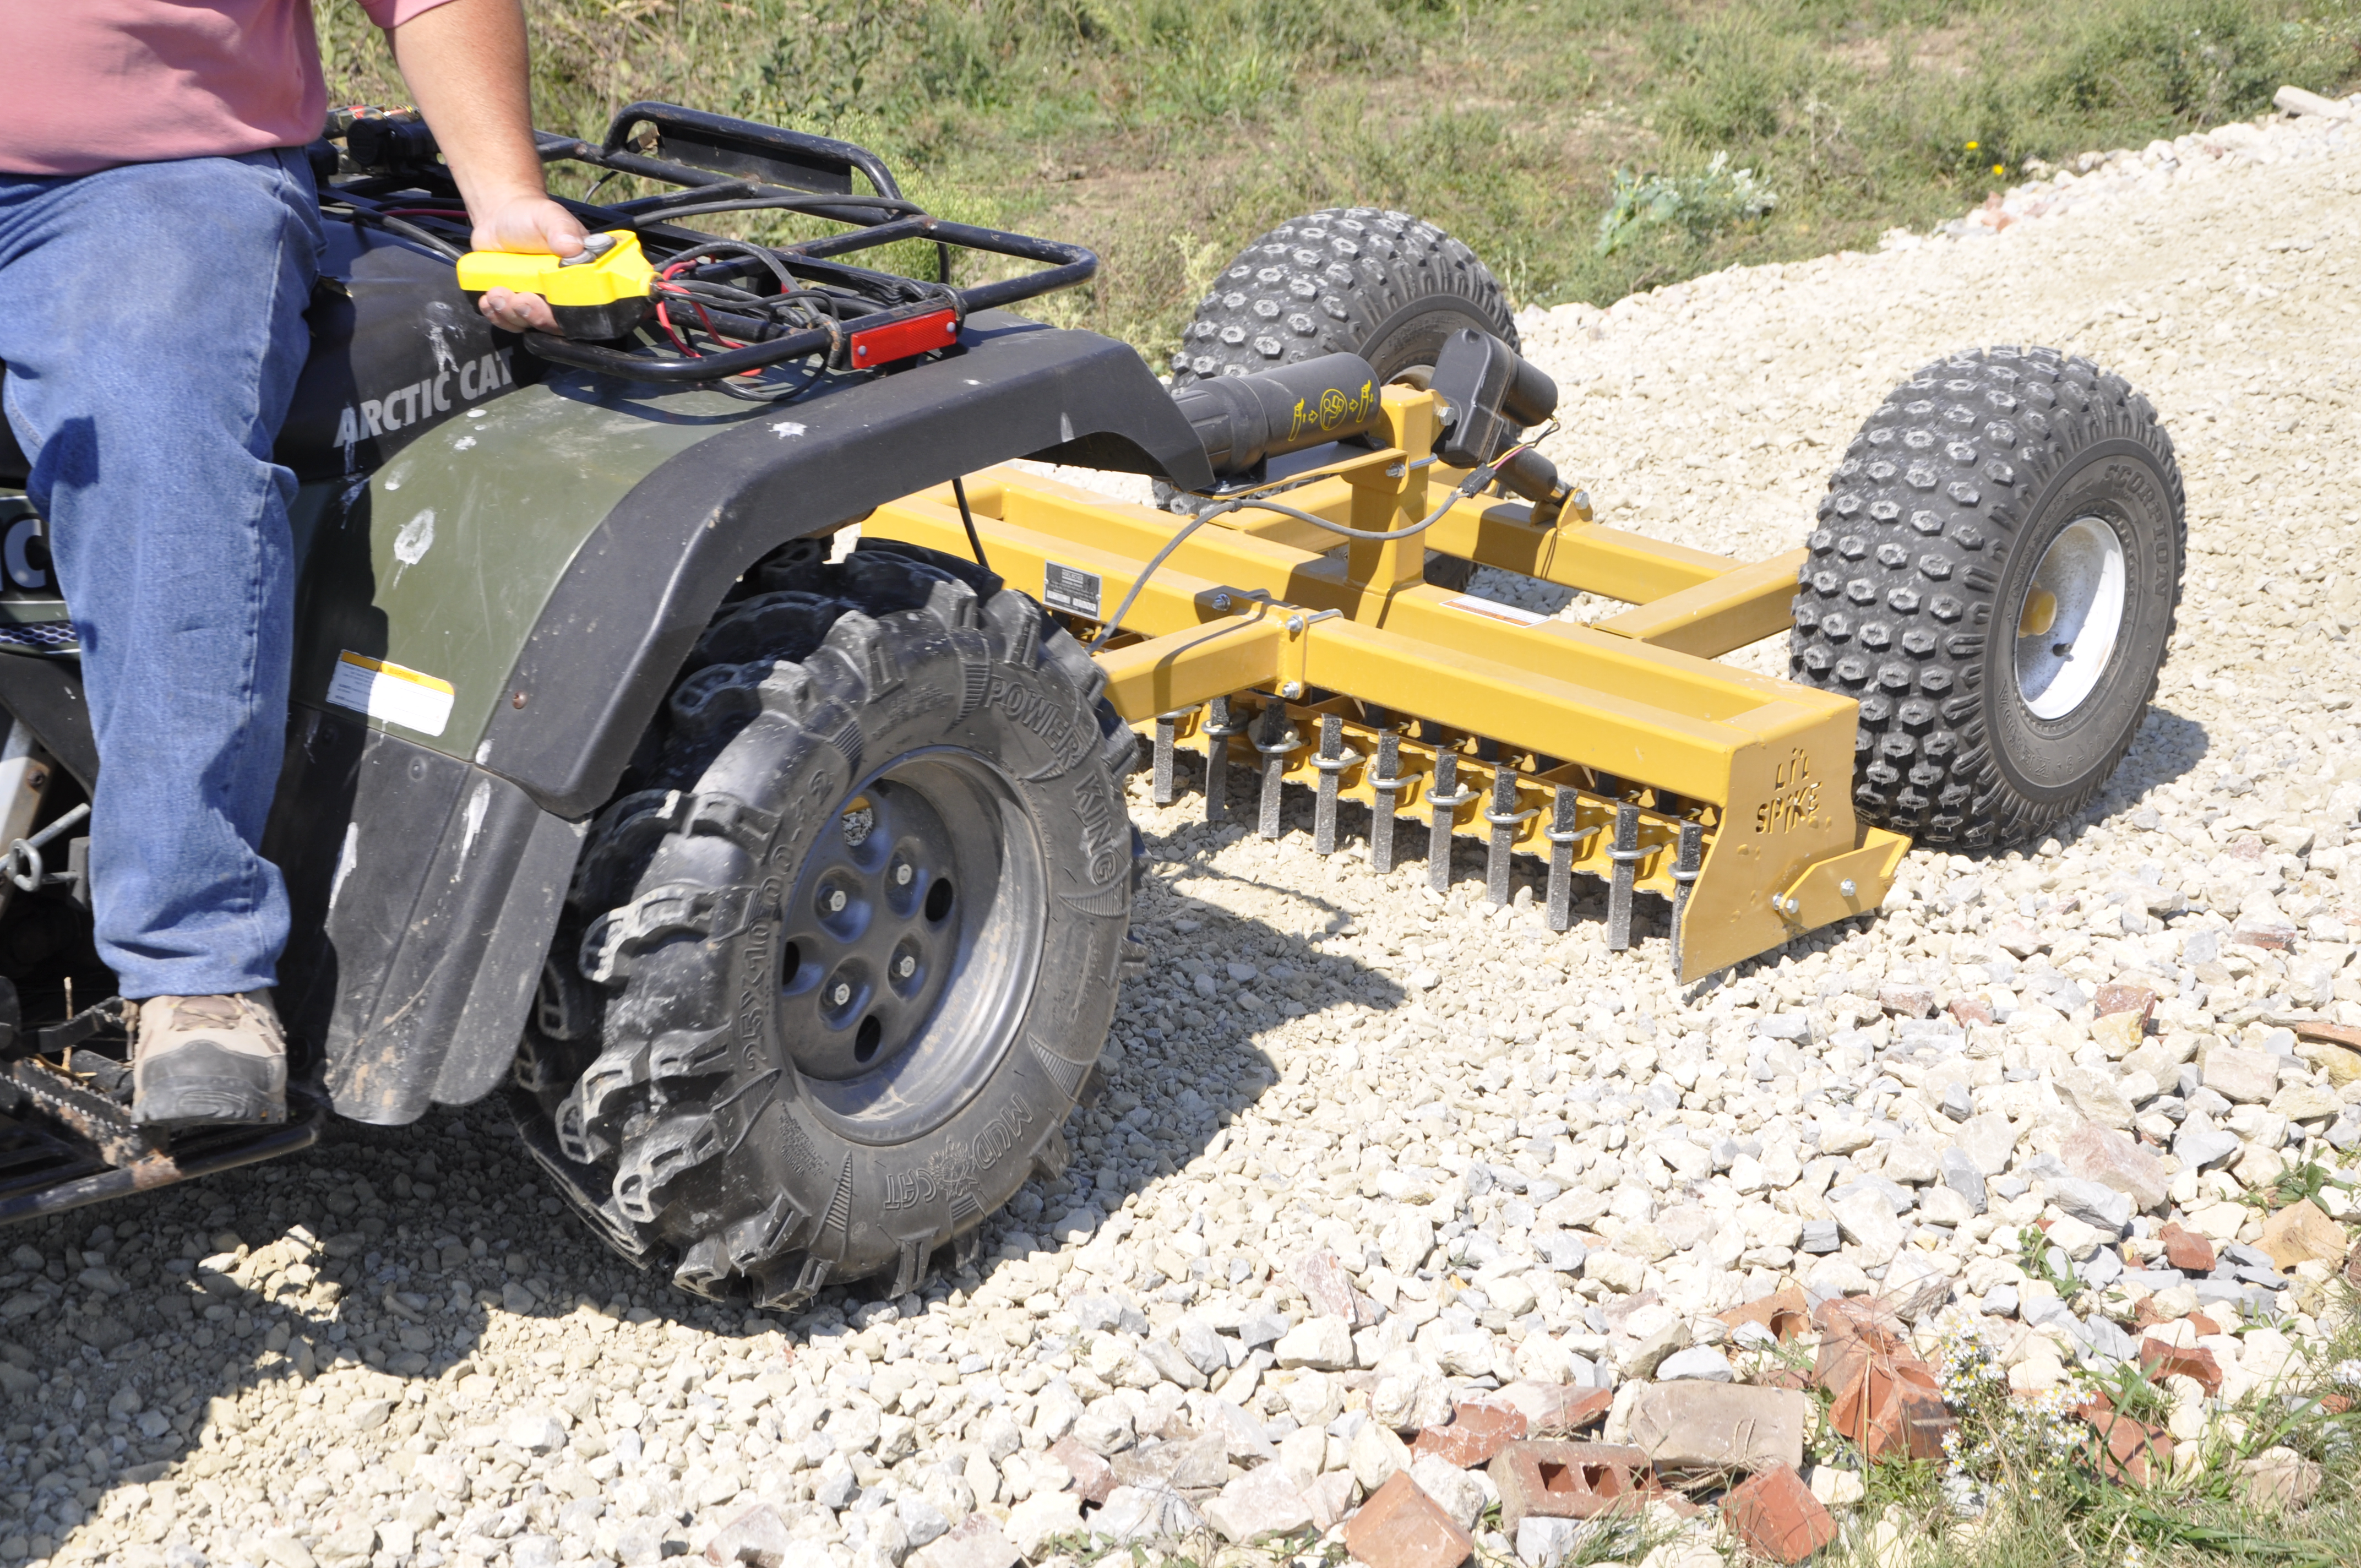
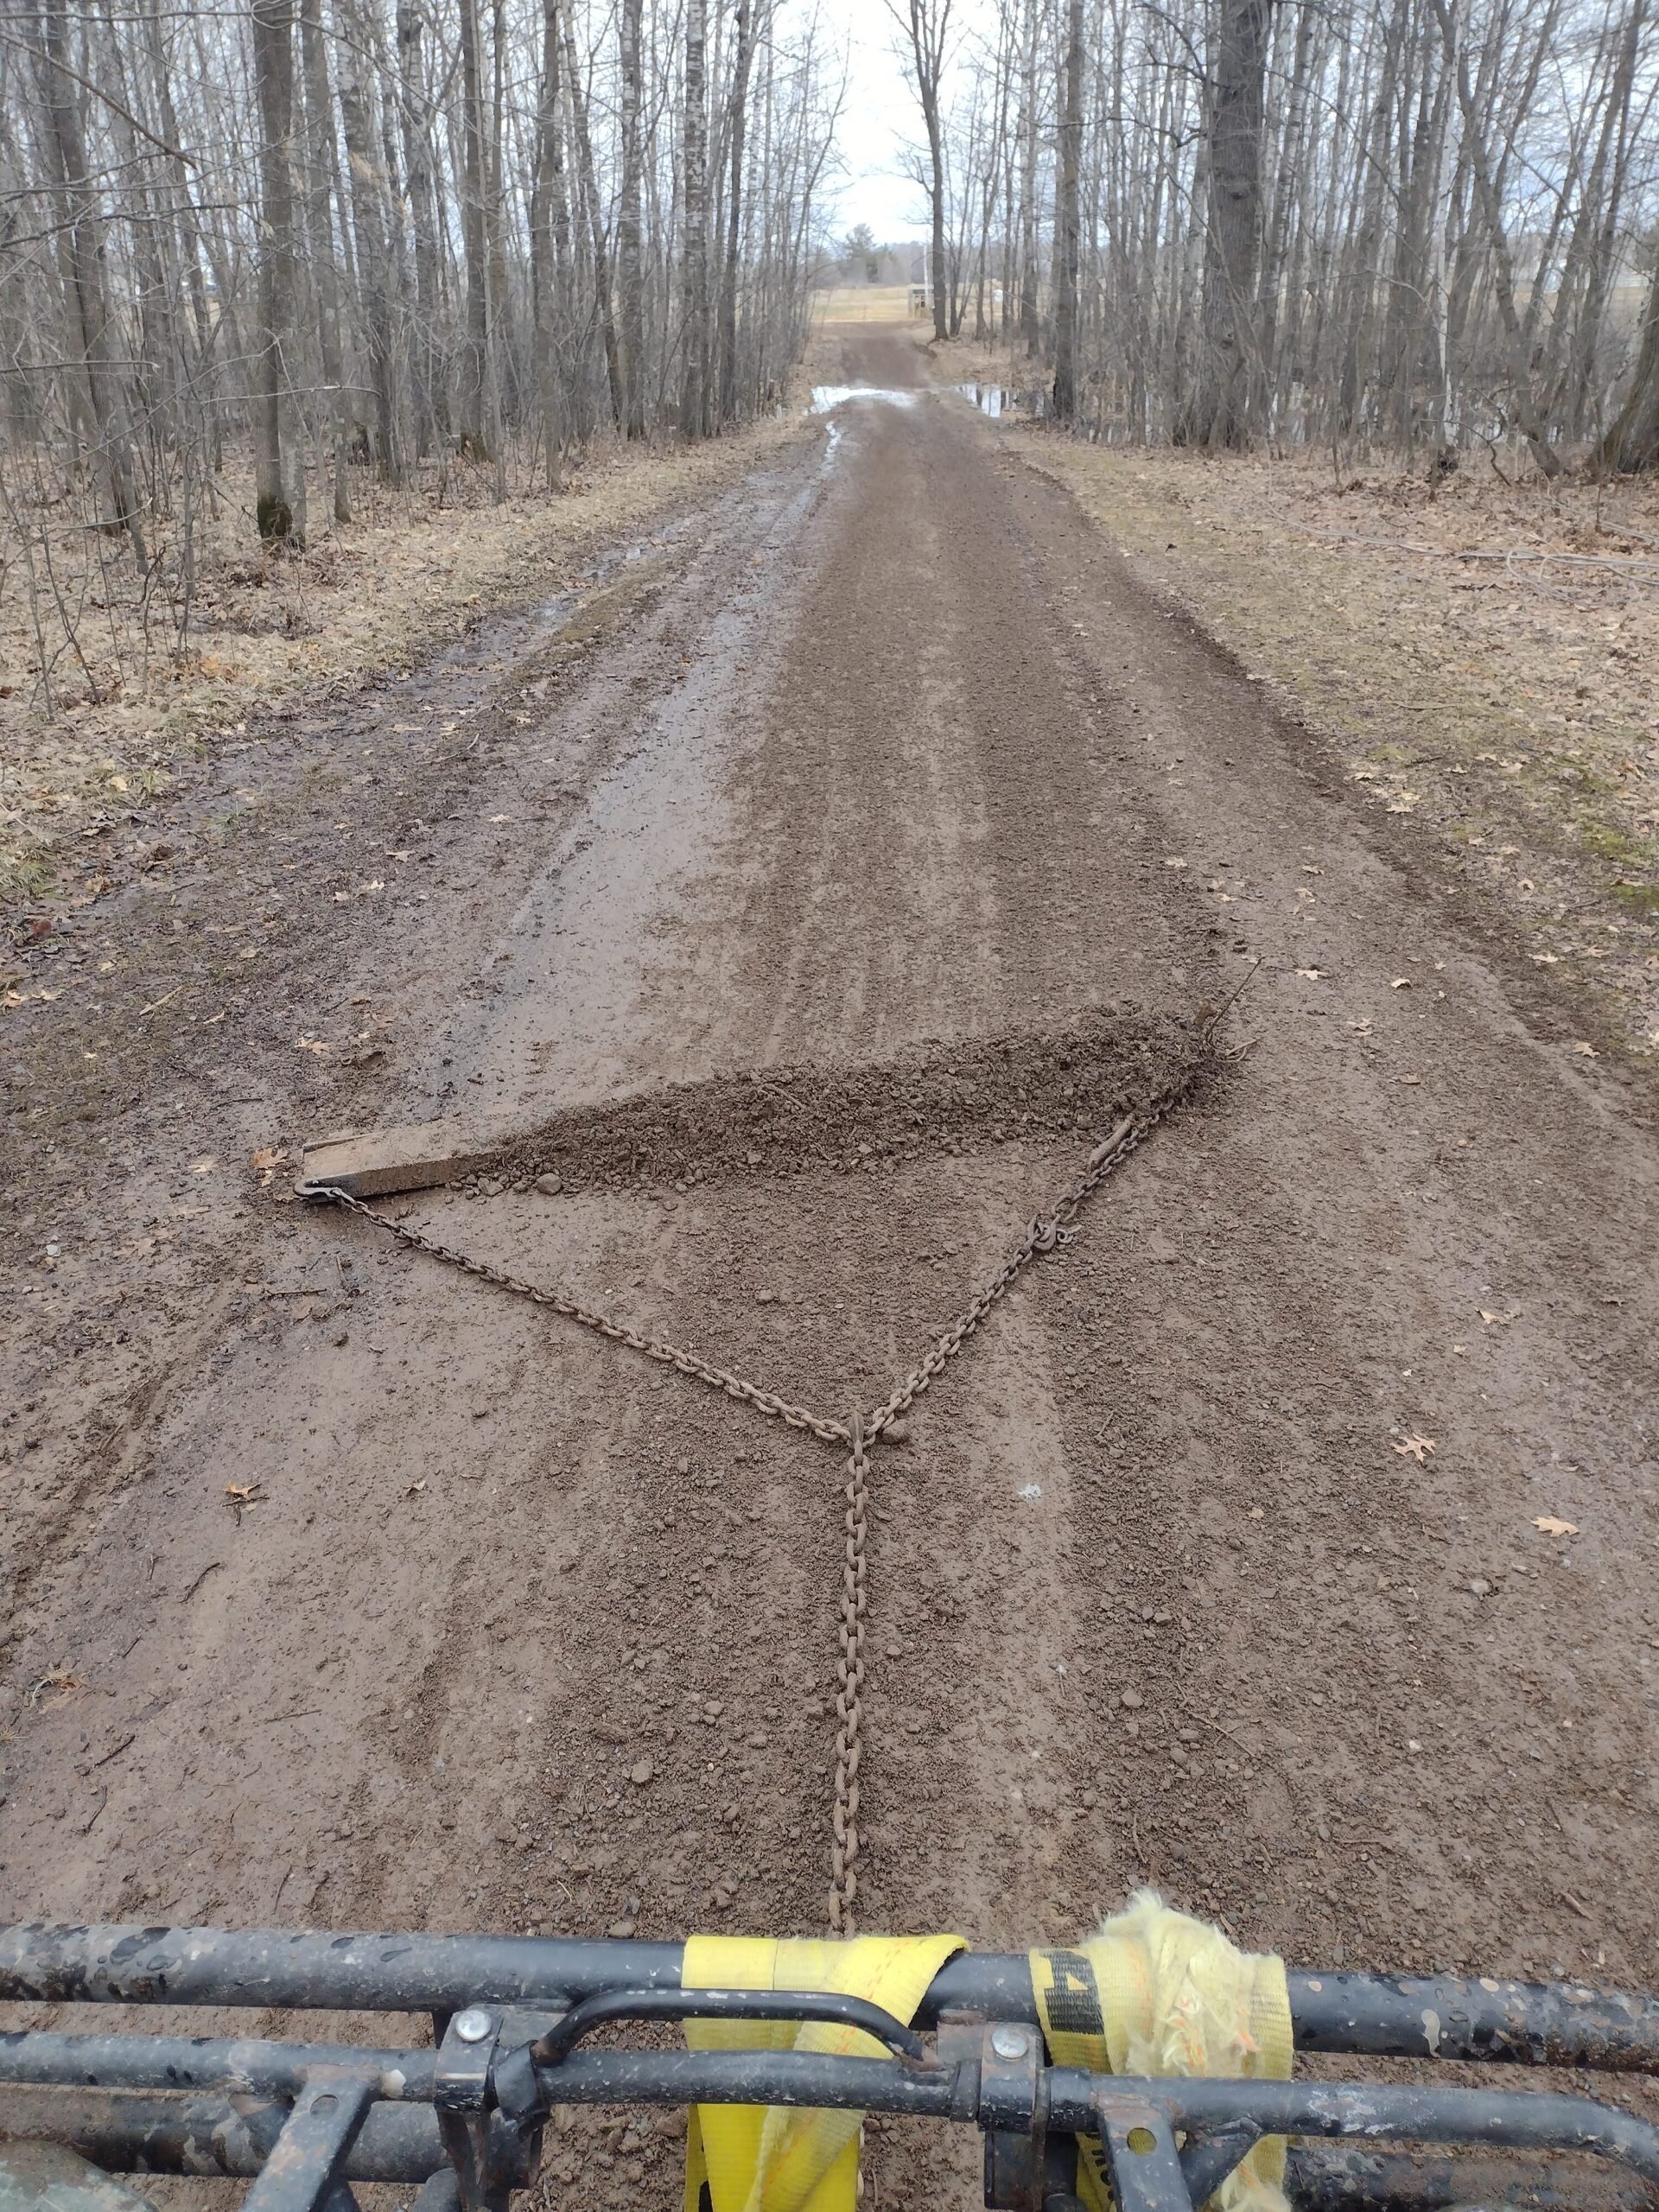
A homemade gravel drag is a DIY tool designed to level and smooth out gravel surfaces, such as driveways, pathways, or even large parking areas. Unlike commercial options, which can be expensive and cumbersome, a homemade gravel drag is cost-effective, customizable, and easy to build. It typically consists of a wooden or metal frame with chains, weights, or other components that help redistribute gravel evenly across the surface. This tool is particularly useful for homeowners, farmers, or property managers who frequently deal with loose gravel and want a practical solution for maintaining their surfaces.
There are several compelling reasons to consider building your own gravel drag. First and foremost, it’s an affordable alternative to purchasing specialized equipment or hiring professionals. With basic materials like wood, metal, and chains, you can create a functional gravel drag for a fraction of the cost. Additionally, a homemade gravel drag offers flexibility in design, allowing you to tailor it to your specific needs. For instance, you can adjust the weight or size depending on the area you need to cover. Furthermore, using a gravel drag is an eco-friendly option, as it reduces the need for heavy machinery that consumes fuel and emits pollutants.
Beyond cost savings and environmental benefits, a homemade gravel drag also provides a sense of accomplishment and self-reliance. There’s something incredibly satisfying about building and using a tool that solves a real problem on your property. Plus, it’s a great way to engage in a hands-on project that enhances your DIY skills. Whether you’re dealing with a small residential driveway or a larger commercial space, a homemade gravel drag is a versatile and practical solution that can save you time, money, and effort in the long run.
How Does a Homemade Gravel Drag Work?
The mechanism behind a homemade gravel drag is surprisingly straightforward. When pulled behind a vehicle, such as a tractor, ATV, or even a truck, the drag’s design allows it to redistribute gravel across the surface. The chains or metal bars attached to the frame dig into the loose gravel, breaking up clumps and leveling out uneven areas. As the drag moves forward, the weight of the tool ensures that the gravel is compacted and smoothed, creating a uniform surface. This process not only enhances the appearance of the driveway but also improves its functionality by reducing the risk of potholes and uneven patches.
One of the key factors that make a homemade gravel drag effective is its ability to adapt to different terrains. Whether you’re dealing with freshly laid gravel or an older surface that has become uneven over time, the drag can be adjusted to suit the specific conditions. For instance, adding weights to the frame increases the downward pressure, making it more effective on compacted or hard surfaces. Similarly, using longer chains or bars can help cover a wider area, making the tool more efficient for larger spaces. This adaptability ensures that your gravel drag can handle a variety of challenges, from minor touch-ups to full-scale driveway overhauls.
Another advantage of a homemade gravel drag is its simplicity. Unlike complex machinery, which often requires technical expertise to operate and maintain, a gravel drag is easy to use and requires minimal upkeep. Once built, it can be stored conveniently and pulled out whenever needed. This makes it an ideal solution for property owners who want a quick and hassle-free way to maintain their gravel surfaces. With just a few passes, you can achieve professional-grade results, transforming your driveway into a smooth and visually appealing surface.
Read also:Reba Theme Song The Iconic Melody Behind The Hit Tv Series
What Tools and Materials Do You Need to Build a Gravel Drag?
Building a homemade gravel drag doesn’t require an extensive list of tools or materials, but having the right ones on hand will ensure a smooth and successful construction process. Here’s a breakdown of what you’ll need:
- Frame Materials: The frame is the backbone of your gravel drag, so it needs to be sturdy and durable. You can use either wood or metal, depending on your preference and available resources. Pressure-treated lumber is a popular choice for wooden frames due to its resistance to moisture and decay. Alternatively, steel or aluminum tubing can provide a lightweight yet robust option for metal frames.
- Chains or Metal Bars: These components are essential for redistributing gravel. Heavy-duty chains are ideal for breaking up clumps and leveling the surface, while metal bars can add weight and stability to the drag. You can repurpose old chains from farm equipment or purchase them from a hardware store.
- Weights: Adding weights to your gravel drag increases its effectiveness, especially on compacted or uneven surfaces. Concrete blocks, sandbags, or even scrap metal can serve as weights, and they can be easily attached to the frame using bungee cords or straps.
- Fasteners: Depending on your design, you’ll need screws, bolts, or nails to assemble the frame and attach the chains or bars. Stainless steel fasteners are recommended for their durability and resistance to rust.
- Tools: Basic tools like a drill, saw, wrench, and measuring tape will be necessary for cutting and assembling the materials. If you’re working with metal, a welder might also come in handy for securing joints.
With these materials and tools, you’ll be well-equipped to build a functional and durable homemade gravel drag. The next step is to plan your design and start assembling the components.
Step-by-Step Guide: Building Your Own Homemade Gravel Drag
Design Considerations for Your Gravel Drag
Before you start assembling your homemade gravel drag, it’s important to consider the design that best suits your needs. The size of your driveway, the type of vehicle you’ll use to pull the drag, and the condition of your gravel surface will all influence your design choices. For smaller driveways, a compact drag with lightweight materials may suffice, while larger areas might require a heavier and more robust design. Additionally, think about how you’ll attach the drag to your vehicle—using a hitch or tow strap is a common method, but ensure it’s secure and compatible with your setup.
Assembly Tips for a Durable Gravel Drag
Once you’ve finalized your design, it’s time to start building. Begin by constructing the frame, ensuring it’s sturdy and level. If you’re using wood, pre-drill holes to prevent splitting, and use weather-resistant screws for added durability. For metal frames, welding the joints will provide a strong and long-lasting structure. Next, attach the chains or metal bars to the frame, spacing them evenly to ensure consistent coverage. Finally, add weights to the frame, securing them firmly to prevent shifting during use. Test the drag on a small area to ensure it functions as expected, and make any necessary adjustments before using it on your entire driveway.
How to Use Your Homemade Gravel Drag Effectively?
Using your homemade gravel drag is a straightforward process, but there are a few tips to keep in mind to ensure optimal results. First, ensure that the surface is free of large debris, such as rocks or branches, which could damage the drag or interfere with its performance. Next, attach the drag to your vehicle using a secure hitch or tow strap, and drive slowly across the gravel surface. Multiple passes may be necessary to achieve a smooth and even finish, especially on heavily uneven areas. For best results, use the drag after rain or when the gravel is slightly damp, as this helps the material settle more effectively.
Maintenance Tips: Keeping Your Gravel Drag in Top Shape
To ensure your homemade gravel drag remains in good condition, regular maintenance is essential. After each use, inspect the frame for signs of wear or damage, and tighten any loose screws or bolts. Clean the chains or metal bars to remove dirt and debris, and apply a rust-resistant coating if necessary. Storing the drag in a dry, sheltered area will also help prolong its lifespan. With proper care, your gravel drag can provide years of reliable service.
Is Building a Homemade Gravel Drag Worth the Effort?
Building a homemade gravel drag is undoubtedly worth the effort, especially when you consider the cost savings and convenience it offers. By investing a small amount of time and money upfront, you can create a tool that eliminates the need for expensive equipment rentals or professional services. Additionally, the satisfaction of completing a DIY project and the improved appearance of your driveway make it a worthwhile endeavor.
Frequently Asked Questions About Homemade Gravel Drags
Can I Use a Homemade Gravel Drag on Asphalt or Concrete?
No, a homemade gravel drag is specifically designed for loose gravel surfaces and should not be used on asphalt or concrete. Doing so could damage both the drag and the surface.
How Often Should I Use My Gravel Drag?
The frequency of use depends on the condition of your driveway and the amount of traffic it receives. As a general rule, using the drag every few months or after significant weather events is sufficient to maintain a smooth surface.
What Are Some Common Mistakes to Avoid When Building a Gravel Drag?
Common mistakes include using weak materials, failing to secure components properly, and neglecting to test the drag before full-scale use. Avoid these pitfalls by planning your design carefully and double-checking your work.
In conclusion, a homemade gravel drag is a practical and cost-effective solution for maintaining gravel surfaces. With the right materials, design, and maintenance, it can provide years of reliable service. So why wait? Start building your gravel drag today and enjoy a smoother, safer driveway tomorrow!
For more information on gravel maintenance, check out this external resource.